
Insiderbits will explore how My Solar Panel makes phones estimate optimal tilt, orientation, electricity generation, shading, and other PV system variables during a solar panel installation.
This guide will show how to use the app for initial planning, the tools most commonly associated with installation work, and how financing affects a solar upgrade.

4.3/5
Which is the best solar panel installation and orientation app?
Anyone with the right orientation about shading and expected energy production, for example, can start planning a solar panel installation.
And you can get that from a specialized app that will turn those technical variables into estimates that are better to compare from a phone.
My Solar Panel (iOS/Android) is our recommendation for this type of planning.
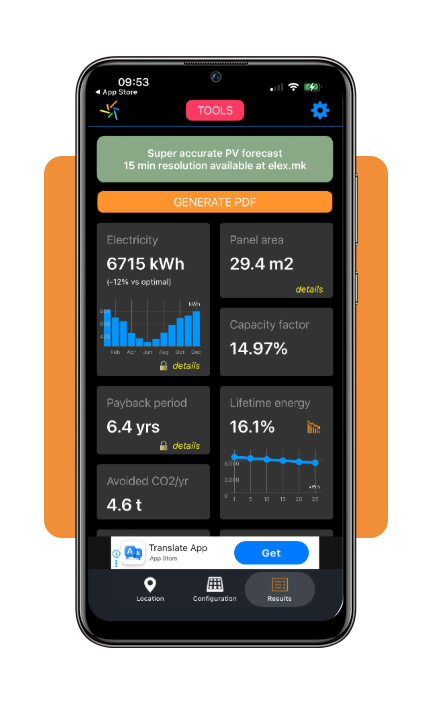
It allows users to select a location, configure a photovoltaic system, and estimate optimal tilt, orientation, annual and monthly electricity generation, system area, and expected energy yield.
Besides all of that, My Solar Panel (iOS/Android) includes devices for evaluating shading and overall project feasibility as well.
One particularly useful feature for solar panel installation planning is the real-time PV simulator.
With that, the phone can be positioned at different angles and directions to estimate how orientation can affect solar output.
Then, it provides a way to visualize the difference between possible panel positions.
Financial estimates are also within the app, so you get informed about payback period, system cost, energy degradation, and levelized cost of electricity.
That makes it useful for getting an initial picture of whether a proposed solar system makes financial sense.
Features available in the My Solar Panel platform
Solar planning involves several variables that affect one another, so having them in the same app makes the whole operation smoother.
My Solar Panel (iOS/Android) begins by separating basic and advanced inputs, allowing users to start with a simpler configuration and add more detail when needed.
Its main features are optimal tilt and orientation calculations, monthly irradiance, electricity-generation estimates, shading analysis, panel quantity and area calculations, and system optimization.
Moreover, the Pro version adds satellite maps, tracking configurations, detailed financial analysis, PDF reports, and additional system-design tools.
Therefore, for every homeowner deciding if a system is financially worthwhile, these estimates are mixed with a solar savings test to compare potential energy savings.
Step-by-step: how to calculate optimal tilt and sun alignment using your phone
My Solar Panel (iOS/Android) uses location data, system settings, and a real-time simulator to calculate recommended tilt and orientation before solar panel installation.
Check how to properly use the app:
Step 1: download the app
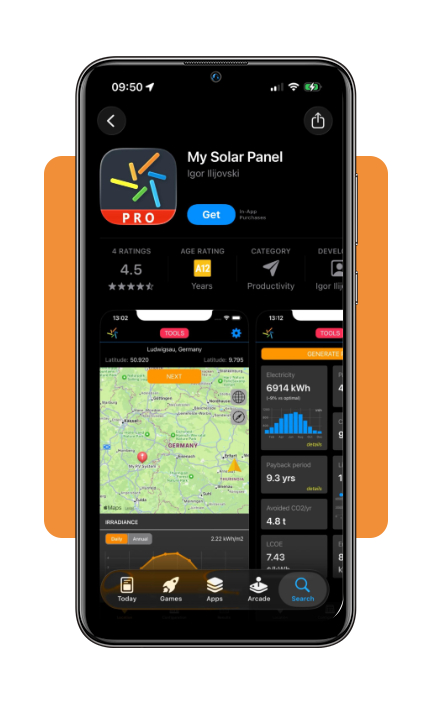
To begin with, download My Solar Panel (iOS/Android), and install it.
Step 2: choose your location
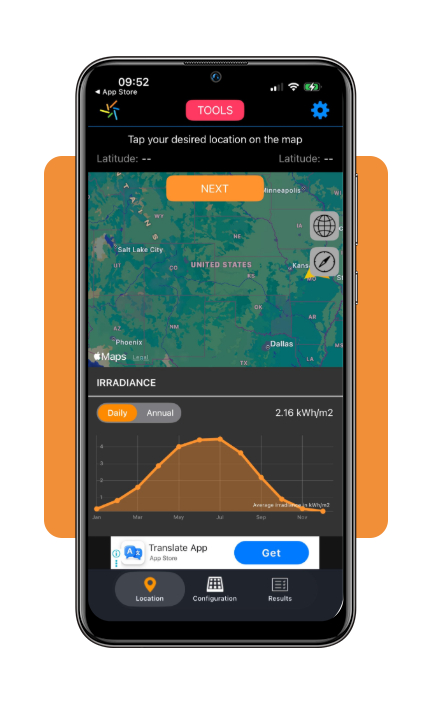
After installing, open My Solar Panel (iOS/Android) and select the location where the system will be installed. The app will use this location to calculate solar irradiance and sun position.
Step 3: enter your system details
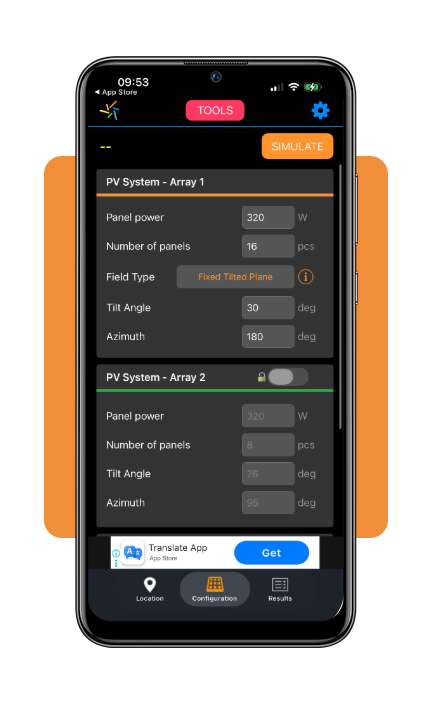
Now open the system design section and add the requested PV information.
Step 4: simulate with your phone
Lastly, use the Solar PV Simulator and position your phone at the angle and direction you want to test.
Move the phone to compare different positions and observe how the estimated energy yield changes in real time.
Essential tools for DIY solar installation
A solar panel installation involves different tools like mechanical mounting, cable preparation, measurement, and electrical verification.
Therefore, the list depends on which part of the work you plan to handle yourself.
For rooftop systems in particular, electrical connections and final commissioning should be left to a qualified installer or electrician.
For basic assembly and mounting work, common tools include socket and wrench sets, screwdrivers, drills and bits, tape measures, levels, wire cutters, and wire strippers.
When it comes to electrical testing, it calls for a digital multimeter and, depending on the system, clamp meters or other PV-specific testing devices.
Equally important are proper personal protective equipment that includes gloves, eye protection, and appropriate fall protection when roof access is involved.
It is common for experienced DIY installers to recommend organizing connectors, cable ties, labels, spare hardware, and torque tools before beginning the physical work.
Energy Saving Trust, for example, recommends qualified installation and notes that a qualified electrician is still needed to connect panels to the home’s electrical system.
In short, having the correct tool for each component reduces the temptation to improvise with equipment that could damage connectors or mounting hardware.
Even so, even with the right tools, solar panel installation should be divided between tasks that are reasonable for a homeowner and those that require professional electrical work.
Home improvement loans for solar upgrades
Sometimes these solar projects require a significant upfront investment because panels, inverters, mounting equipment, batteries, and professional installation can be expensive.
In this context, financing can spread that cost, but the interest rate and repayment period should be compared with the expected energy savings.
In the U.S., the Department of Energy notes that solar loans work similarly to home improvement loans, allowing homeowners to purchase the system while paying for it.
Alongside, some programs offer below-market rates, while certain mortgage products include energy improvements as part of home financing.
Another category is the green home improvement loan, designed for energy-efficiency or low-carbon upgrades.
The Green Finance Institute, for example, reports that these products finance solar panels, batteries, heat pumps, and insulation, although availability and lending terms vary.
Keep in mind that a lower upfront cost could look attractive, but the loan still needs to fit comfortably within the household budget and the expected long-term value of the system.
4.3/5
Planning a solar project with the right information
A successful solar panel installation starts with careful planning and orientation. From that, installation conditions all influence how well the final setup may perform.
My Solar Panel (iOS/Android), supports the early planning stage, while the professional electrical work remains important once the project moves to installation.
Meanwhile, a project this big brings financial concerns as well, making it another part of the decision.
So comparing project costs, expected savings, and loan terms, if that’s the case, helps homeowners judge whether a solar upgrade fits both the property and the household budget.
Enjoyed this article? Save Insiderbits to your favorites and discover the most useful tech tips.