Google Authenticator serves as an ally for your digital protection, offering an additional layer of verification. With this app, every sign-in is doubly secured.
This tutorial by Insiderbits will take you through the ins and outs of using this authentication app. Our easy-to-follow guide is designed to make the setup process stress-free.
Embrace the full potential of two-factor authentication with our expert insights! Explore with us below to learn how this technology can be a game-changer for your digital security.
관련: Android에서 앱 아이콘 및 이름을 변경하는 방법
Grasping the Google Authenticator Basics
Google Authenticator is a free tool that secures your online activities. It’s simple to use and adds a layer of safety with unique codes for logging in.
With this authentication app, you get a new code every few seconds. It works even when your phone is offline, keeping your accounts accessible only to you.
Two-factor authentication is like a double lock for your digital doors. This Google’s authentication tool works as the second key, making your data much safer.
You can also use Google Authenticator across multiple services if you want. Whether it’s your email or social media, this app keeps all your logins tightly secured.
Breaking Down Google Authenticator’s Mechanics
Google Authenticator safeguards your accounts with more than a password. It creates codes that you use during sign-in, providing an additional layer known as two-factor authentication.
One of its best features is that it doesn’t need data or Wi-Fi to work. It uses a time-based algorithm to produce a code every 30 seconds, which you use to verify your identity.
Google’s 2FA authentication boosts your cyber protection. You’ll enter the code from your phone after your password, proving your identity with something only you have.
Starting with Google Authenticator is simple, and very intuitive. You can choose to scan a QR code or enter account details manually for a quick and secure setup.
Handle several accounts seamlessly within the app. Each account will have its unique, time-sensitive code for you to use, streamlining your security without complicating it.
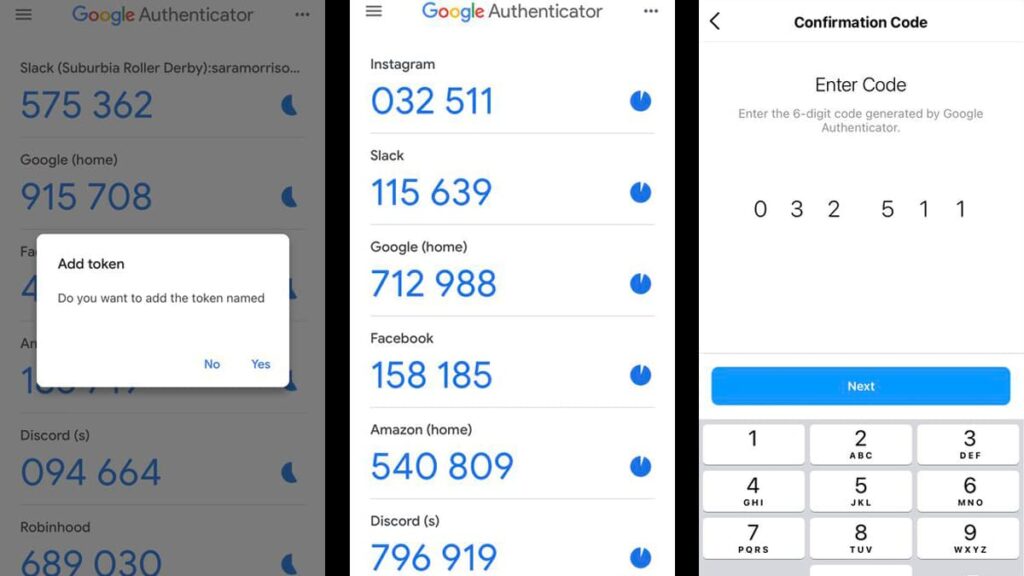
Whenever you sign into a service, the app will show a six-digit code on your phone. This code is your second key, and it changes with each login attempt for better security.
Adopting Google Authenticator means committing to a proactive stance on privacy. You can use the app to secure your accounts against common digital threats.
A step-by-step to downloading Google Authenticator
Google Authenticator stands as a guard for your digital security, offering a powerful two-factor authentication system to keep your information safe.
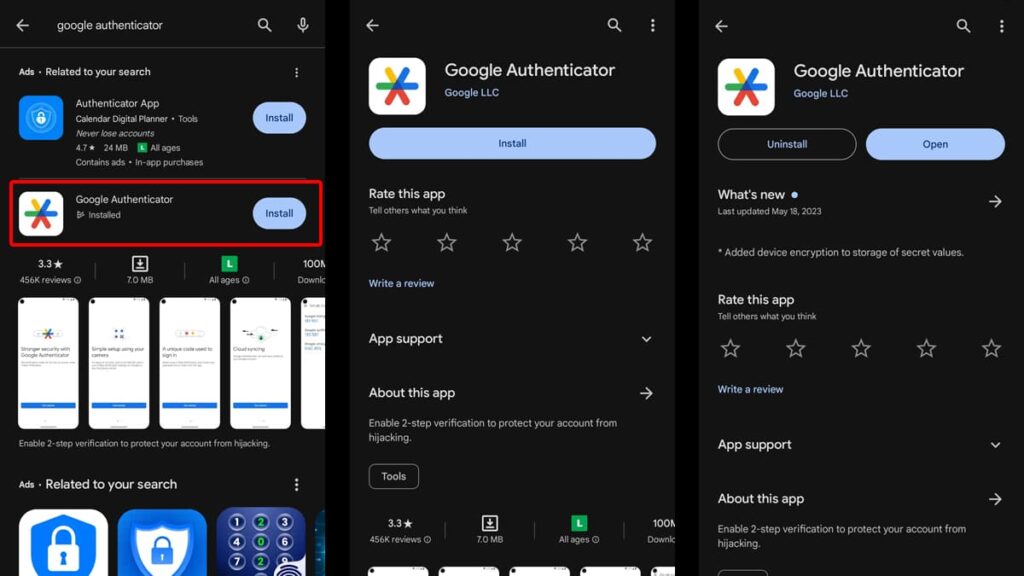
This authentication app is easy to download and set up on any device. Here’s how you ensure your online accounts are just a touch away from protection on both Android and iOS:
Android 디바이스:
- Begin by tapping the Play Store icon on your home screen or app drawer.
- In the Play Store, engage the search function by tapping the magnifying glass.
- Enter “Google Authenticator” in the search bar and hit enter.
- Select the app by Google LLC and hit “Install”.
- Next, watch as the app swiftly downloads to your device.
- After the download completes, open the app to begin the setup process.
iOS 디바이스:
- Find your way to the App Store, Apple’s blue app icon with an “A” made of tools.
- Tap the search tab at the bottom and type in “Google Authenticator”.
- Identify the app and tap “Get” to start your download.
- Authenticate your ID with your Apple credentials if prompted.
- Once installed, the app icon will pop up on your home screen, ready for action.
Starting with Google Authenticator: a how-to
In the digital world, protecting your online accounts is important, and the Google Authenticator app is your first line of defense.
Next, we’ll take you through the steps of using the app. From launching it to adding accounts, get all the knowledge you need to use this security feature with ease.
Initiating the Google Authenticator Application app
After the installation is complete, open the app on your device. You’ll see a setup screen that guides you through the introduction and outlines the benefits of using its features.
Tap “Get Started” to move on to the next phase. This two-factor authentication app is designed to be intuitive, paving the way for a smooth and straightforward setup process.
Next, you’ll have to log in using your Google account, or you can continue without one. Having a Google account streamlines the process.
Setting Up Your First Account
The first step within the app is to add an account, which is pivotal for activating two-factor authentication. Tap the “Add a Code” button to begin this process.
When opting for the QR code option, simply point your device’s camera at the service code you wish to secure. The app will then instantly identify and incorporate the account.
For manual setup, select “Enter a setup key” and type in the key given by the service. This binds your account to the app and ensures that it generates the correct codes.
Adding Additional Accounts
With Google Authenticator, juggling different accounts for distinct services is effortless. Just hit the vibrant “+” icon on the main display to integrate additional accounts.
For every new service, replicate the action of scanning their QR code or keying in the provided setup key. Label each account clearly for easy identification within the app.
With multiple accounts added, the app will list each with its own unique code. You can now manage and access all your two-factor authentication codes in one place.
Using the Authenticator Daily
Accessing your secured services daily will require the Google Authenticator app to retrieve your temporary verification codes.
These codes change every 30 seconds, providing a powerful layer of security. It’s like having a constantly changing digital padlock on your accounts.
When a service requests your two-factor authentication code, open the app to find the currently valid code and enter it on the service’s login page to verify your identity.
관련: WhatsApp에서 사진 및 동영상을 복구하는 방법
Activating Google Authenticator on a new device
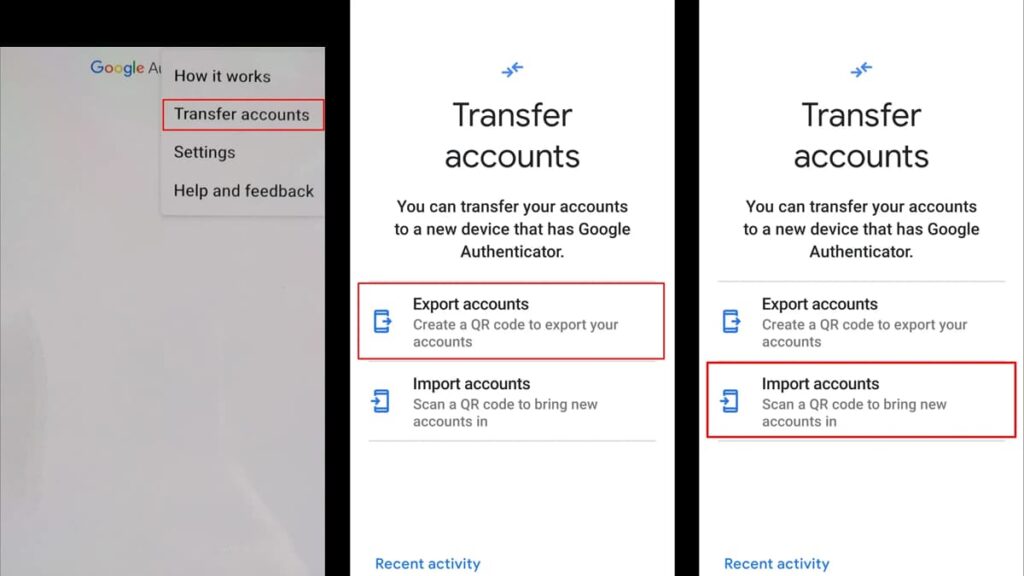
Switching to a new phone and wondering how to take Google Authenticator with you? No need to worry; moving this authentication app is easy.
Keeping your two-factor authentication intact is crucial, and we’ll guide you through the steps to ensure that your transition to a new phone is smooth.
Start on your old phone:
- Launch the Google Authenticator app.
- Navigate to the settings within the app and find the “Transfer accounts” feature.
- Choose “Export accounts” and be prepared to confirm your identity if prompted.
Prepare your new phone:
- Download the Google Authenticator app from the app store on your new phone.
- Launch the app and select “Begin setup”.
- Opt for “Import accounts” to proceed.
Transfer the accounts:
- Back on your old phone, select the accounts you wish to transfer.
- A QR code will be generated. Use your new phone to scan this code.
- This will import the accounts onto your new phone.
Finalize the setup:
- Make sure that all accounts have been transferred properly.
- Verify that the codes are being generated and are in sync.
- You can now safely remove Google Authenticator from your old device.
- Some services may require you to reactivate two-factor authentication settings.
Safeguarding access: Google Authenticator concluded
Google Authenticator redefines your account security by making logins safer and simpler. It’s the guard dog for your digital life, providing new codes for every login.
In this article, we’ve unwrapped the usability of Google’s authentication app, detailing how it can be a game-changer in protecting your personal data.
Brought to you by us at Insiderbits, this tutorial simplifies what two-factor authentication means, making it accessible and user-friendly for even the most non-tech savvy.
Curious about more tech tips? We have a vast array of guides just like this one. Jump on your next digital adventure with us and stay one step ahead in cyber security.

