Finding it hard to disconnect from social media? Learning how to deactivate Messenger can give you a break. It’s your first step to quiet down the digital noise.
Insiderbits is here to guide you with a simple tutorial. We make it easy and clear so you won’t have to figure out how to navigate the process by yourself.
Say goodbye to non-stop notifications and hello to peace and quiet. Keep reading and discover how silence can become your new superpower.
How to deactivate Facebook Messenger on mobile
Say you’re concerned about data privacy, or maybe just feel like you have too many messaging apps. Whatever the reason may be, deactivating Messenger is a simple process.
But there are a couple of things you should keep in mind before going through with your decision. The first one is that your Messenger and Facebook accounts are intertwined.
Since December 2019, you can’t have a separate Messenger account using just your email or phone number – you also need a Facebook account (active or not).
So if you choose to deactivate Messenger, you also choose to deactivate Facebook. However, you can reactivate Messenger later while keeping Facebook offline.
The second thing is that the deactivation process happens through Meta, so it works exactly the same on Android and iOS devices. So without further ado, let’s begin:
Step One: Launch the app and go to “Accounts Center”
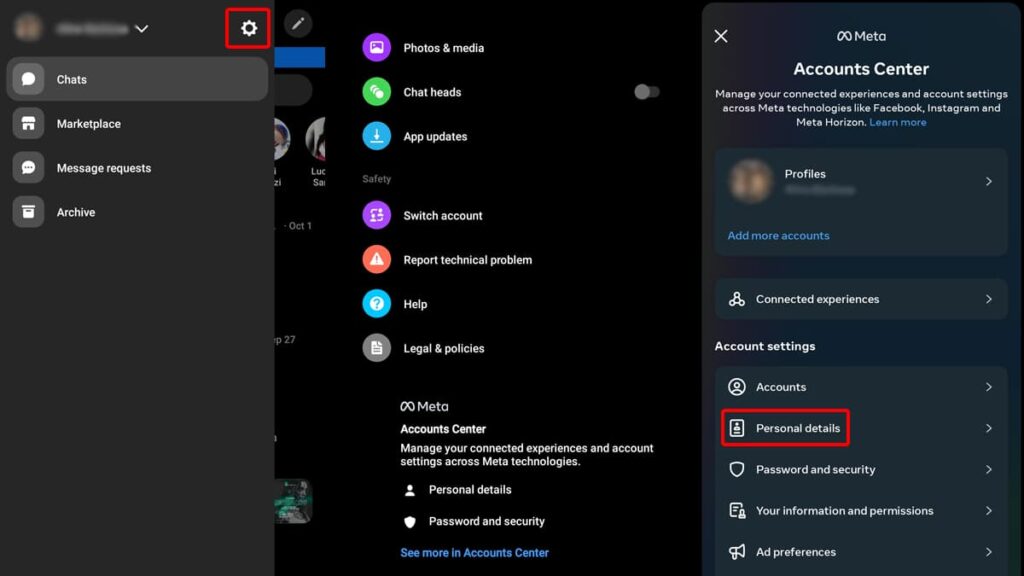
Start by opening the Messenger app on your phone and tap the three lines at the top left, which is the menu. Then, tap the gear icon next to your name.
Scroll down until you see Meta’s “Accounts Center” and tap on the blue “See More in Accounts Center” option. Once you’re there, select the “Personal Details” option.
Step Two: Follow through
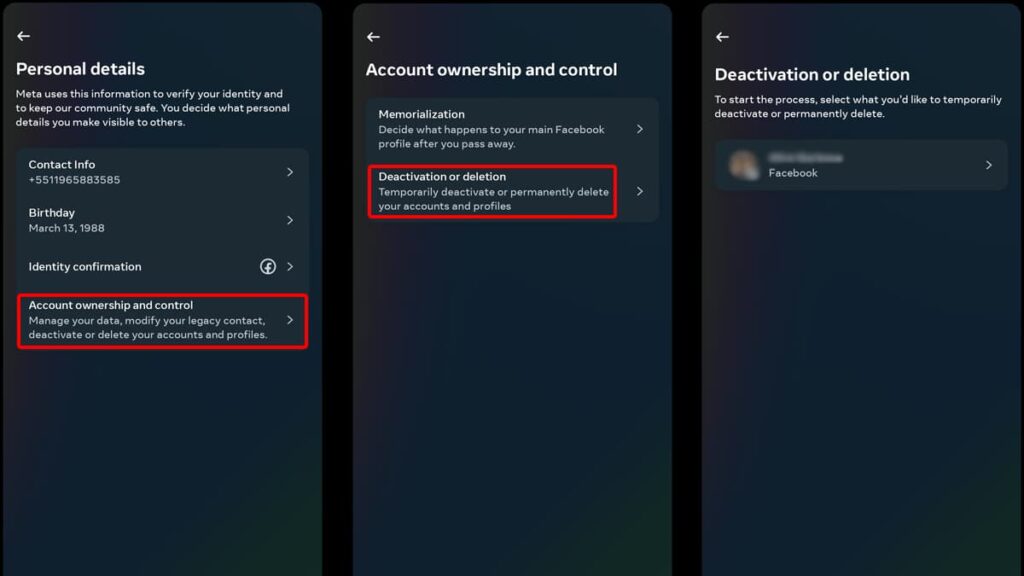
In “Personal Details”, click on “Account Ownership and Control” and a new page will pop up. On this new page, pick “Deactivation or Deletion”.
Next you’ll have to choose which account you want to deactivate or delete. This is especially useful if you have more than one account to your name.
Step Three: Deactivating your Facebook account
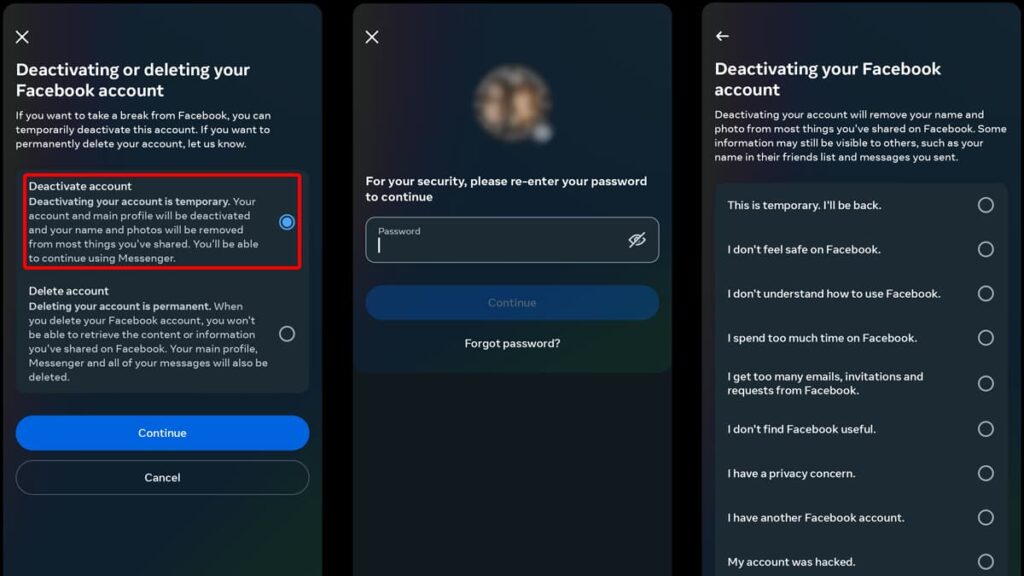
In the following page, Meta will inquire whether you want to deactivate or delete your account. Select “Deactivate Account” and tap on “Continue”.
You’ll have to enter your password for confirmation that no one else is accessing your account. Key in your credentials and tap on “Continue” once again.
Then, Meta will present a series of options as to why you’re deactivating your account. Choose one that aligns best with your reasoning and tap “Continue”.
Regardless of which option you choose, the company will offer a series of workarounds to keep you on the platform. Tap “Continue” once more.
Step Four: Taking your Messenger break
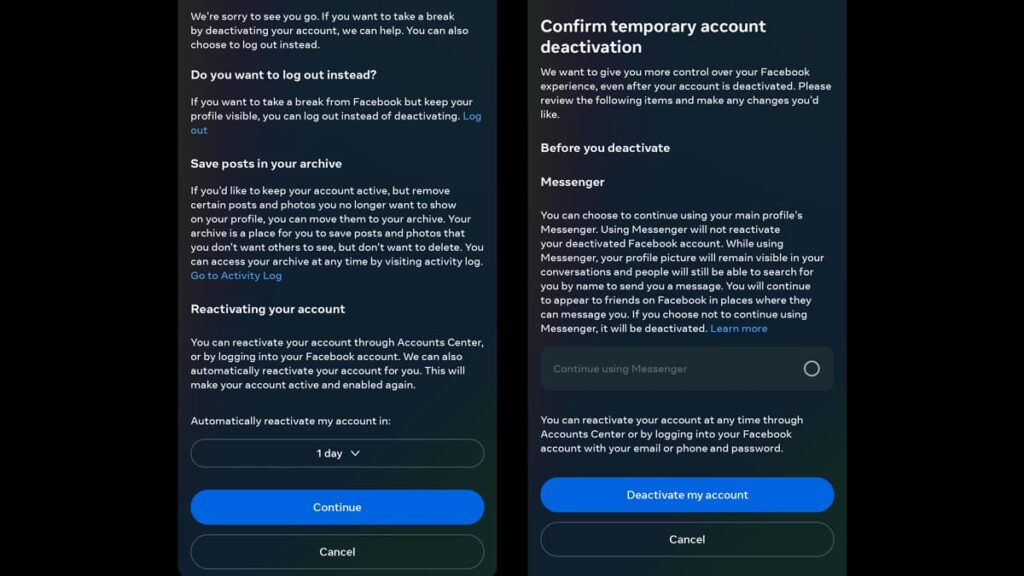
The final page provides some important information regarding your account and what follows after deactivating. Remember you can reactivate it anytime by simply logging back in.
Read through all the info, tap on “Deactivate my Account”, and you’re done! You’ll get a little in-app notification that your account is now inactive, so you can close the app afterward.
How to deactivate Facebook Messenger on a desktop
If you want, you can also deactivate your Messenger account on your computer. The process is just as easy as it is via mobile and you don’t need a desktop client installed.
This method is particularly useful if you can’t access your phone for some reason, and only takes a couple of minutes. Ready to begin? Let’s go!
Step One: Access your account on the web
Begin by opening your web browser and going to the official Messenger website. Next, key in your Facebook credentials in the respective fields and click on “To Enter”.
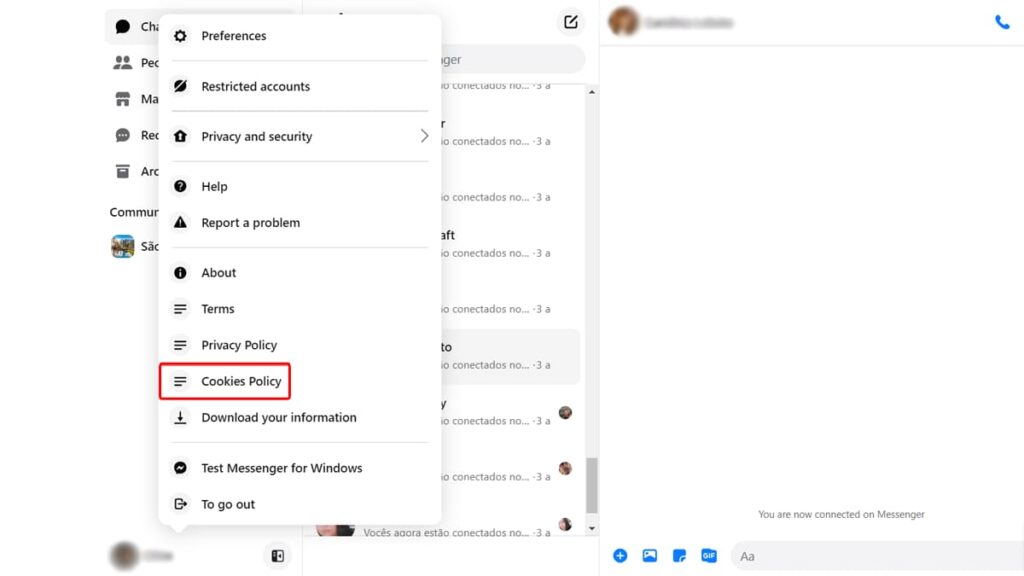
Once you’re logged in, click on your profile picture on the bottom left of your screen and that action will open your “Settings”. Click on “Cookies Policy”.
That will take you to Meta’s “Privacy Center”. Select your account on the left menu by clicking on “View Your Accounts”, and then “Manage These Accounts in Account Center”.
Step Two: Deactivating your Messenger account
From here on out, the process is nearly identical to deactivating your account on mobile. Click on “Personal Data” and then “Account Ownership and Control”.
In the pop-up window, select “Deactivation or Deletion”, the account you’re deactivating, and click on “Continue”. Type in your password and give “Continue” another click.
Choose a reason for leaving, click “Continue” a couple more times, and then finally click on the “Deactivate my Account” blue button. You’ll be promptly logged out, and that’s it!
Officially signed off: a break from the buzz
You’ve just mastered the art of quieting the digital space around you. With these easy steps, the power to disconnect and deactivate your Messenger account is literally at your fingertips.
Remember, this is not saying “goodbye” but “see you later” to Messenger. And you’re the one who decides when it’s time to step back into the world of instant messages.
We at Insiderbits crafted this guide with you in mind, making sure every digital decision feels less confusing and more doable. We’re here to uncomplicate tech and make things easier.
So how about another deep dive into our archives? Step into a world where every article offers clarity, simplicity, and empowerment. Keep clicking, keep learning!


