The MIT App Inventor program is changing the world of app creation. With a user-friendly design, it allows anyone to easily build Android and iOS apps.
In this Insiderbits review, we’ll examine the program’s influence on app development with its versatile tools, offering insights suitable for anyone who’s looking to start programming.
Our detailed walkthrough reveals how MIT App Inventor makes app creation accessible, inviting you to unleash your creativity in the tech world. Read on!
関連記事 How to create an app store (like Google Play Store)?
What is MIT App Inventor and how does it work?

MIT App Inventor is a platform that democratizes app development. It’s a visual programming environment where users can create without needing advanced coding skills.
With its simple interface, MIT App Inventor allows users to drag and drop elements to design their app. This makes app development accessible, especially for those just starting.
Users can add features like buttons, text, and images to their apps. MIT App Inventor then translates these into a working application, simplifying the technical process.
One of the key strengths of MIT App Inventor is its ability to teach coding concepts. While building apps, you’ll learn about logic, design, and how software components interact.
MIT App Inventor is also ideal for beginner app development. It provides a safe, educational space for anyone to experiment and learn without being overwhelmed by complex code.
The platform encourages creativity and problem-solving. Users of all ages can develop unique, functional apps, making it a valuable tool for learning and innovation.
MIT App Inventor features
MIT App Inventor offers a range of features that make it ideal for beginners and experienced developers alike. Let’s explore its key functionalities below:
- Drag-and-Drop Interface: Easy to use, allowing users to visually assemble their apps, perfect for beginner app development.
- Visual Programming Language: Simplifies coding, turning complex codes into user-friendly blocks, enhancing learning in app development.
- Live Testing: Instantly test your app on your device, making the development process interactive and responsive.
- Multi-Component Integration: Supports different components like GPS, sensors, and data storage, expanding app functionalities.
- Active Community & Resources: There’s a wealth of tutorials, forums, and guides available, making learning and problem-solving easier.
- Cross-Platform Accessibility: Accessible from any web browser, enabling users to work on projects from anywhere.
The platform is a solid tool in app development, especially for those new to the field. Its rich features provide a rewarding experience, encouraging creativity in app creation.
関連記事 The 10 best free apps on Play Store in 2023
MIT App Inventor benefits
Using MIT App Inventor is about personal growth and development. This platform offers several personal benefits, opening up new opportunities. Let’s dive into what you can gain:
- Cost-Effective Learning: Completely free, making it accessible for everyone interested in app development without financial barriers.
- Skill Development: Enhances critical thinking and problem-solving skills, vital in tech-related fields and beyond.
- Creativity Boost: Encourages creative thinking as users design and bring their unique app ideas to life.
- Technical Knowledge: Provides a solid foundation in programming concepts, beneficial for future tech endeavors.
- Career Advancement: Useful for building a portfolio, potentially leading to career opportunities in the tech industry.
MIT App Inventor is a platform where creativity, learning, and opportunity converge, offering you a chance to improve your skills and potentially advance your career.
MIT App Inventor limitations
While there are many pros, there are still a few cons to consider. For instance, the platform’s simplicity can be a drawback for advanced developers seeking more sophisticated coding.
MIT App Inventor’s visual approach might oversimplify programming concepts, potentially inhibiting a deeper understanding of complex coding.
Additionally, performance issues can happen in more complex projects, as the tool isn’t designed for high-end, professional app development needs.
関連記事 Androidでアプリのアクセス許可を管理・把握する方法
How to download the MIT AI2 Companion app
MIT App Inventor doesn’t offer a standalone mobile app for creating apps. Instead, it provides the MIT AI2 Companion app, which is essential for testing and debugging apps.
To effectively use MIT App Inventor for app development, downloading the MIT AI2 Companion app on your mobile device is crucial.
This enables real-time testing and debugging by connecting your smartphone directly to the desktop client, enhancing the development process.
The MIT AI2 Companion app integration with the main MIT App Inventor platform streamlines the testing phase, making it an indispensable resource for developers.
アンドロイド端末:
- Android端末でGoogle Playストアを開きます。
- Search for “MIT AI2 Companion” in the search bar.
- Select the app from the search results and tap “Install”.
- Once installed, open the app to connect it with your MIT App Inventor project.
iOSデバイス:
- Open the Apple App Store on your iOS device.
- Type “MIT AI2 Companion” in the search bar.
- Click on the app in the search results and choose “Get” to download.
- After downloading, launch the app to sync it with your MIT App Inventor session.
Having the MIT AI2 Companion app bridges the gap between your desktop and mobile device, bringing your creations to life for testing and refinement.
How to use the MIT App Inventor
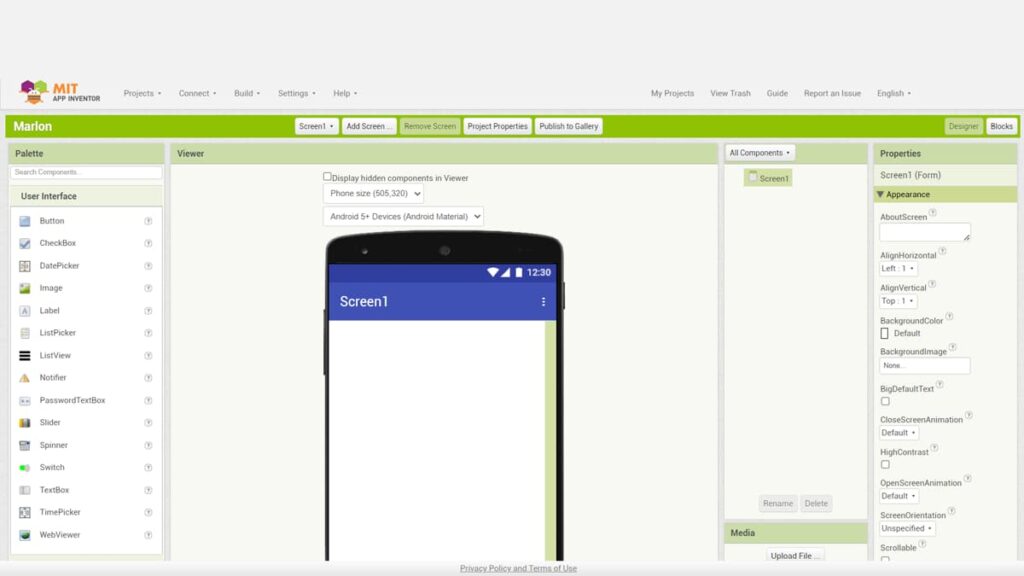
Stepping into app development with MIT App Inventor is a journey filled with creativity and learning. See how to effectively use the platform in our detailed guide below.
Step One: Setting Up Your Account
Visit the MIT App Inventor website and click on “Create Apps” to sign up. You’ll need a Google account to register, ensuring a quick and easy process.
Once registered, you’ll be directed to the main dashboard. Here, you’ll find tutorials and resources to get started on your app development learning process.
Familiarize yourself with the dashboard layout. It’s a simple interface, designed to make your initial steps in app development as smooth as possible.
Step Two: Starting Your First Project
In the MIT App Inventor dashboard, click “Start new project”. Give your project a name, keeping it simple and descriptive for easy reference.
You’ll be taken to the project workspace. This is where you’ll design your app, using the drag-and-drop interface to add different elements.
Start by exploring the components available, like buttons, text, and images. Drag them onto the canvas to start shaping your app.
Step Three: Designing Your App Interface
Use the “Palette” section in MIT App Inventor to select UI elements. You can customize these elements in the “Properties” panel.
Arrange your UI elements on the screen. Think about user experience – how your app will look and feel to the user.
Experiment with colors, fonts, and layouts. MIT App Inventor allows you to preview changes in real time, making design intuitive.
Step Four: Adding Functionality with Blocks
Switch to the “Blocks” section to start programming your app’s functionality. Here, coding is simplified into visual blocks.
Each block represents a piece of code. Snap them together to build the logic of your app, like what happens when a button is clicked.
Even if you have no prior coding experience, the MIT App Inventor’s blocks are beginner-friendly, guiding you through creating functional app components.
Step Five: Testing and Debugging Your App
Use the MIT AI2 Companion app to test your app on a real device. This helps you see how your app works in a practical setting.
Debugging is key in app development. If something doesn’t work, use MIT App Inventor’s guides to troubleshoot and fix issues.
Keep iterating. Test, refine, and improve. This cycle is essential in developing a successful app with MIT App Inventor.
Step Six: Compiling and Sharing Your App
Once satisfied with your app, use the “Build” option in MIT App Inventor to compile your project into an APK file.
Share your APK with friends or upload it to the Google Play Store to reach a wider audience. Remember, app development is a continuous learning process.
関連記事 How to Download Apple Apps on an Android Phone?
Closing our guide through the MIT App Inventor
In our review, we have journeyed through the world of MIT App Inventor, highlighting its ability to open doors in the realm of app development, especially for beginners.
Whether it’s enhancing your skills or bringing a unique app idea to life, this unique and rich platform stands as a powerful resource for all your creative endeavors.
And if you’re eager to explore more about technology and app development, browse through other Insiderbits articles for more insights, tips, and guides in the tech world.
