Deciding to delete your Facebook account is a big privacy step. If you want less online exposure, cutting off social media ties is a start. Additionally, taking this leap can feel free.
Insiderbits is here to make the process easy for you with a simple tutorial, breaking down each step. No confusing terms, just a simple path to follow for full account deletion.
Ready for a quieter life online? Keep reading for the key to a less cluttered, more peaceful digital world. Freedom from Facebook’s grasp is closer than you think!
How to delete your Facebook account on your phone
Facebook has been THE social network for almost two decades now, and while some may argue its time has passed, Mark Zuckerberg’s website still has over 2 billion active users.
But if you’re looking to decrease that number by one and distance yourself from the platform, you can delete your Facebook account in a few simple steps and cut ties for good.
If the thought of losing all of your photos, messages, and videos is what’s holding you back, know that Facebook allows you to download all of your data before you close your account.
Now let’s begin our walkthrough towards account termination. This method works the same for Android and iOS users, so you don’t have to worry about your phone’s operating system.
Step One: Finding “Accounts Center”
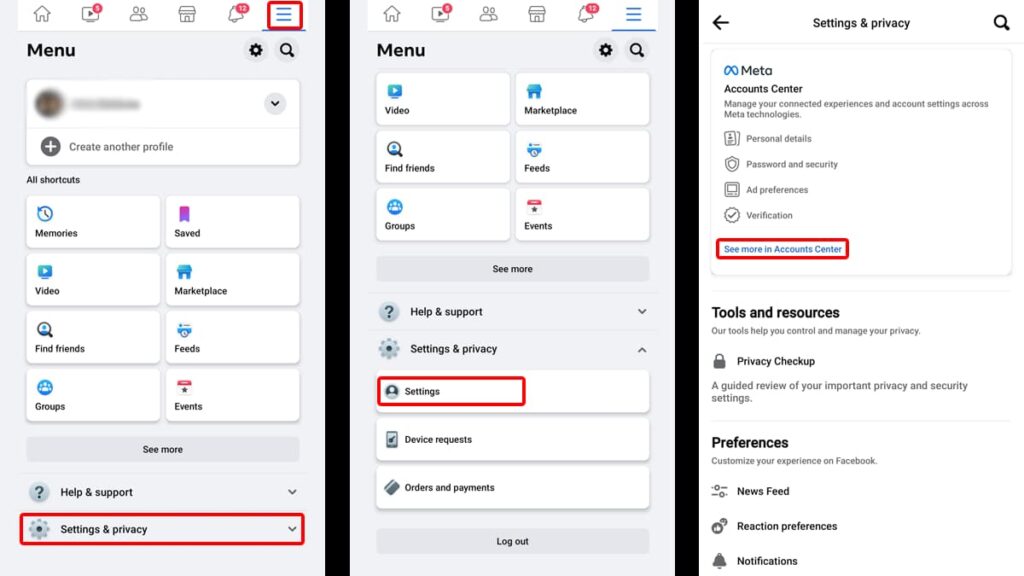
First, open the Facebook app on your phone and log in with your username and password. Then, tap on the menu at the bottom right of your screen (the three horizontal lines).
Once you’re there, tap “Settings & Privacy” and then select “Settings”. A new page will appear, and right at the top, you’ll find Meta’s Accounts Center.
To begin with, your account termination, tap on “See More in Accounts Center”. This action will take you to a separate menu on Meta’s network.
Step Two: Looking for your way out
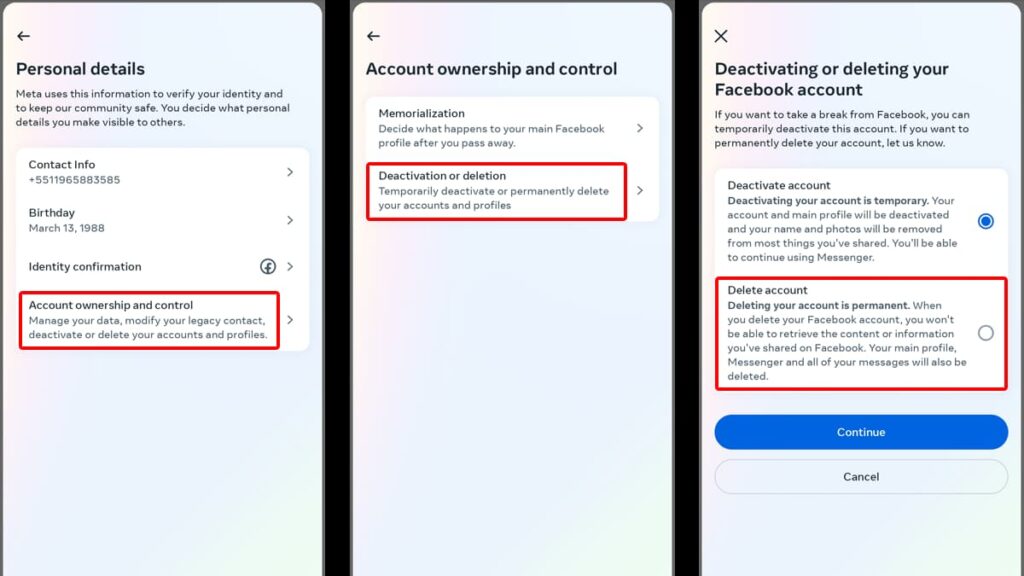
Once you’re in the “Accounts Center”, look for the “Personal Details” tab on the main menu. Tap on it, and then select “Account Ownership and Control”.
Inside that tab, you’ll notice an option that says “Deactivation or Deletion” – tap on it. Next, you’ll have to select which account you wish to close.
After selecting your Facebook account, Meta will present two options: Deactivation or Deletion. Tap on “Delete Account” and on “Continue” after.
Step Three: Reason your way out
Before allowing you to go through, Facebook will inquire as to why you’re leaving. Select the alternative that is the closest to your reasoning and tap “Continue”.
No matter what you choose, the platform will try to get you to stay by presenting solutions to your problem. If you’re resolute, tap “Continue” once more.
Step Four: The warning signs
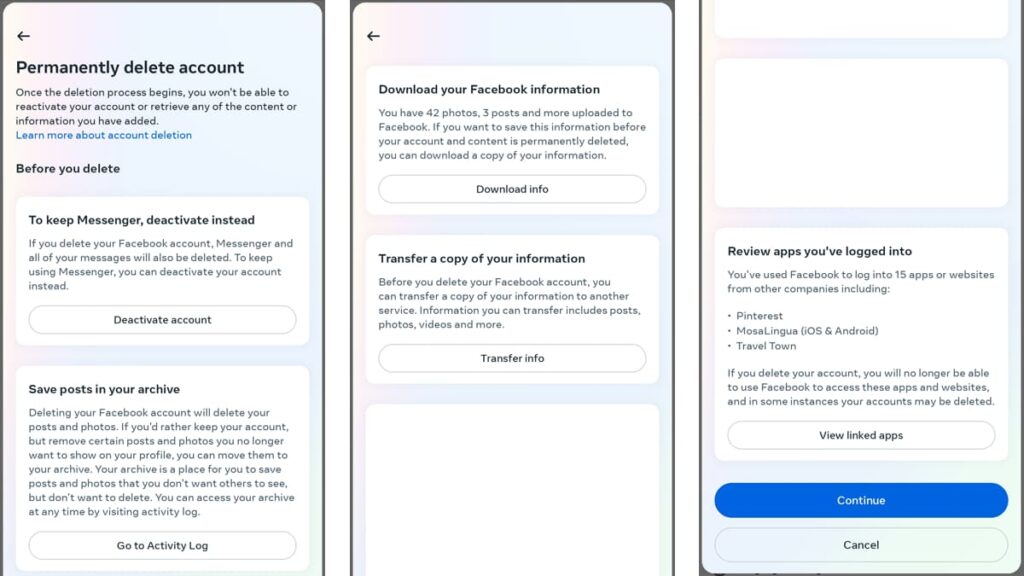
Now Facebook will display a series of warnings before you end your account. The first one is that once your account is gone, you can’t log back in or retrieve any of its content.
Then, they suggest that if you want to keep using their Messenger feature, deactivation is the best course of action. If this is not something that interests you, move along.
Facebook also allows you to save your post and download all of your information before you leave. You can do so by tapping “Go to Activity Log” and “Download Info” respectively.
There are other options as well like the ability to transfer a copy of your info to other services, and to review all apps that are connected to your account. Tap “Continue”.
Step Five: Facebook freedom
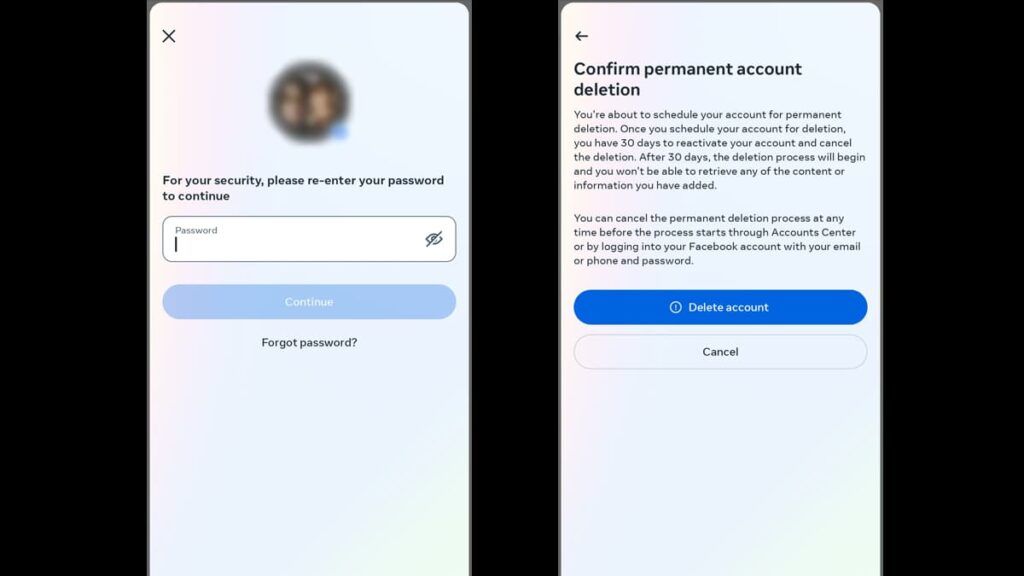
If you have successfully gone through all of these steps, all that’s left now is to delete your Facebook account. Type in your password to continue (and end) the process.
Meta will relay some important info about your account, saying its deletion is scheduled for 30 days. If you change your mind, all you need to do is to log back in and stop the process.
If 30 days have gone by and you are still sure about leaving, you won’t have to do anything. Your account will end as scheduled and you’ll be officially Facebook-free.
Tap on “Delete Account” and you’re done. Meta will automatically log you out of the app and start the countdown to complete account erasure.
How to delete your Facebook account on the web
The other way you can delete your Facebook account is by using a web browser on your computer. It’s simple, effective, and works almost the same as on mobile.
This method is especially useful if you don’t have the Facebook app installed on your phone, or if you can’t access it at the moment. Here’s how you go about doing it:
Step One: Find your “Settings”
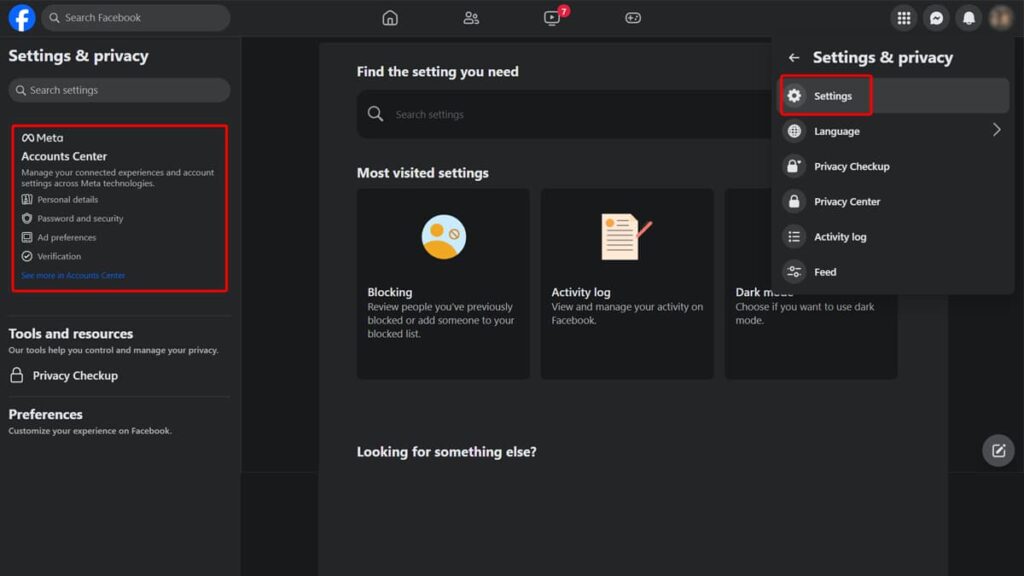
Open a browser on your PC and visit the Facebook website. Then, log into your account using your credentials, and find your profile picture on the top right corner of the screen.
Click on your profile picture and a menu will appear. Click on “Settings and Privacy” and next on “Settings”. On the new page, select “See More on Accounts Center” on the left menu.
Step Two: Navigate “Accounts Center”
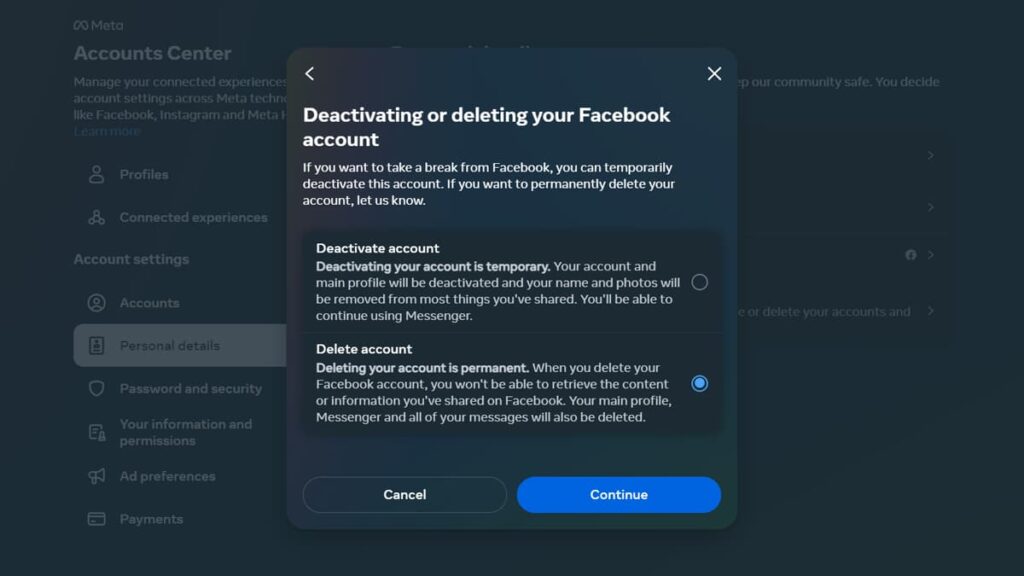
From this point forward, every step is basically the same as deleting your account on mobile. Select “Personal Details”, “Account Ownership and Control”, and “Deactivation or Deletion”.
Then click on your account and select “Delete Account” before pressing “Continue”. Give Meta your reason for leaving, tap “Continue” and read through their warning signs.
| Insiderbits Tip: If you want to download all of your Facebook data (videos, photos, messages, and more), the process is much quicker on your computer. |
Step Three: Close your Facebook account
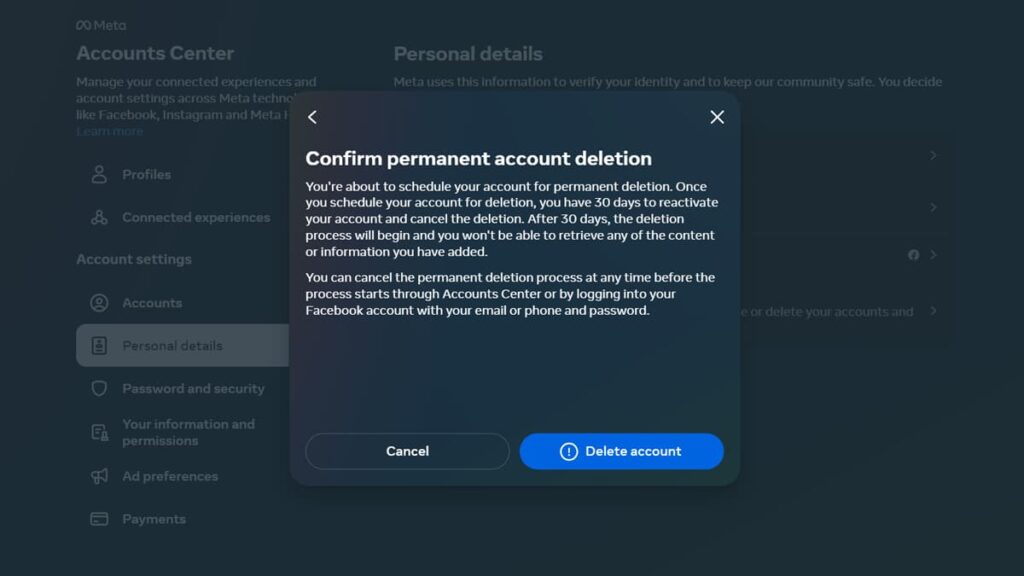
After downloading or transferring your Facebook information to a different service, tap “Continue” and type in your password for the next step.
The next stage is the final one, with Meta letting you know your account deletion is scheduled for 30 days. You can stop the process by simply logging in within the timeframe.
When you’re good and ready, click on “Delete Account” and you’ll be logged out from it. That’s all it takes to step back permanently from Facebook!
Concluding thoughts on deleting Facebook
Congratulations, you’ve successfully navigated the labyrinth of settings and options to free yourself from Facebook’s clutches.
By choosing to delete your Facebook account, you’ve not only reclaimed your online privacy but also taken a significant step towards a healthier digital lifestyle.
This journey with Insiderbits has shown that taking control of your digital footprint doesn’t have to be an impossible task wrapped in tech terms. It’s all about knowing the right steps.
Have you enjoyed this guide? There’s more where that came from! Explore a world of insightful tutorials with Insiderbits – we turn tech troubles into easy talks.


